
A Rolex is more than just a view it s a statement of prestigiousness, preciseness, and craftsmanship. Whether you wear yours or keep it for specialized occasions, conserving its perfect condition is a top priority. One of the most operational ways to protect your rolex mens watch from scratches, scuffs, and routine wear is by applying a caring film. This clear, durable layer acts as a shield while maintaining the master sweetheart of your horologe.
In this guide, we ll walk you through the step-by-step process of installment caring film on your Rolex, along with tips to see to it a smoothen and ripple-free end up.
Why Use a Protective Film?
Before diving into the installation, it s noteworthy to sympathize why tender films are worth considering:
Scratch Prevention Everyday adjoin with hard surfaces, such as desks or door handles, can result little-scratches. A film minimizes this risk.
Resale Value Collectors often value pure . Keeping your Rolex strike-free helps exert or even increase its resale value.
Invisible Shield High-quality films are virtually lightless, meaning your take in s shine and inside information stay on unrevised.
Easy Replacement Unlike polishing, which can wear down the case or bracelet over time, a film can simply be distant and replaced.
Tools and Materials You ll Need
Before start, gather these essentials:
Protective film kit(specifically premeditated for Rolex models)
Microfiber cloth
Cleaning root(gentle soap and irrigate, or a view-safe cleaner)
Tweezers(plastic or rubber-tipped to avoid scratches)
Squeegee or applier car
d
Spray nursing bottle with distilled water(optional for wet application)
Step-by-Step Installation Guide
Step 1: Prepare Your Workspace
Choose a strip, dust-free area with good lighting. A soft rise, such as a microfiber mat or horologist s pad, will protect your Rolex during the work on. Wash your hands thoroughly to avoid transferring oils or fingerprints.
Step 2: Clean the Watch
Use a microfiber material and cleaning root to wipe down your Rolex. Pay tending to the case, bezel, watchband, and clasp. Any dust, dirt, or oil will prevent the film from adhering properly. A clean rise is key to a flawless application.
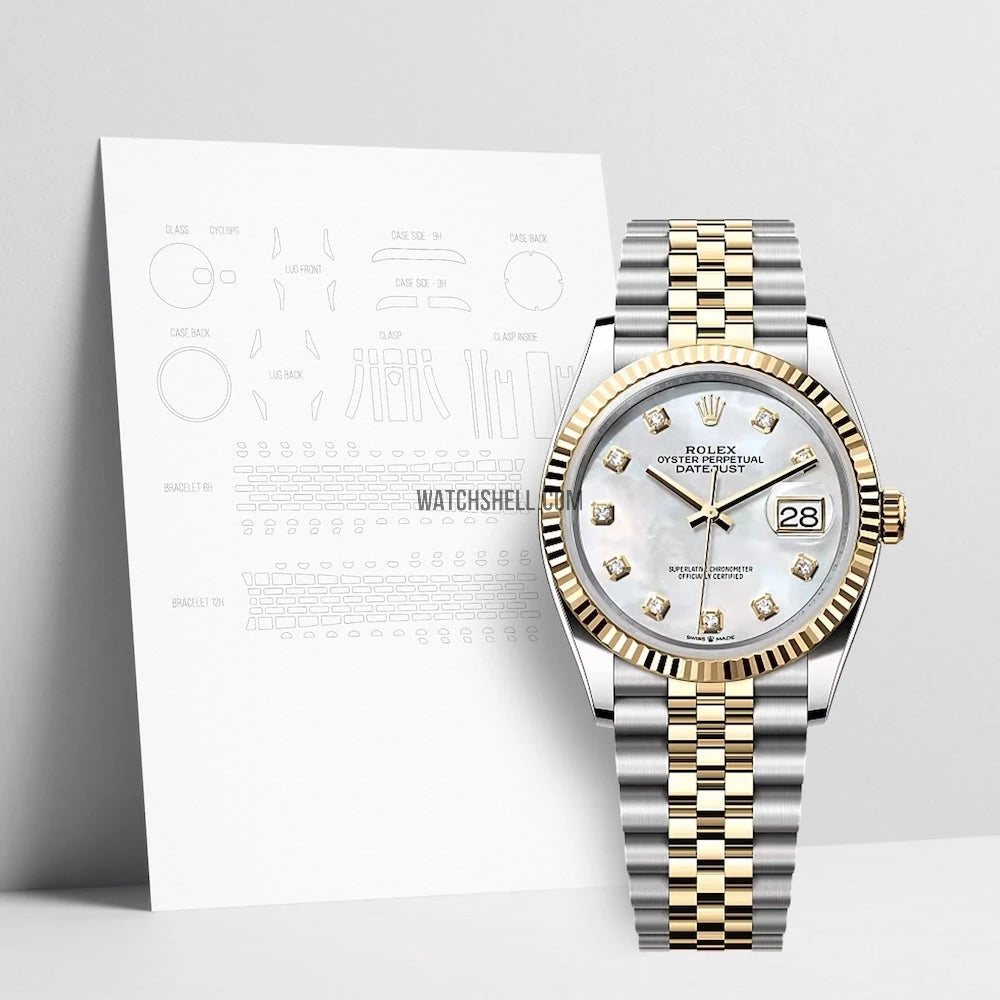
Step 3: Identify the Film Pieces
Protective film kits are usually pre-cut to fit specific Rolex models(Submariner, Daytona, Datejust, etc.). Familiarize yourself with each patch before desquamation off the funding. Some kits include film for the bezel, lugs, watchstrap golf links, clasp, and even the case back.
Step 4: Apply the First Piece
Start with the bigger flat surfaces, such as the case side or watchband golf links. Using tweezers, with kid gloves peel the tender film from its funding. Align it with the rise of your Rolex, qualification sure the edges match precisely.
Step 5: Smooth Out Air Bubbles
Once positioned, mildly weightlift the film into place using your fingers or a modest squeegee. Work from the revolve about outwards to push out any air bubbles. For intractable bubbles, a tiny drop of distilled water can help shift the film before it to the full adheres.
Step 6: Move to Smaller Areas
After the big sections are crustlike, employ the littler, more ticklish pieces. Pay close care to snakelike surfaces like the bezel and lugs. These may require supernumerary solitaire, but the end result is Worth it.
Step 7: Secure the Clasp and Bracelet Links
The and watchstrap are particularly vulnerable to scratches, so insure these areas are muffled in good order. If your kit provides octuple link covers, employ them one by one, orientating cautiously.
Step 8: Final Inspection
Once all pieces are practical, visit your Rolex under bright get off. Look for cornered dust, misaligned edges, or air bubbles. If necessary, lift and reapply any film that isn t session utterly.
Pro Tips for a Perfect Application
Patience is key Rushing through the work can lead to misaligned or furrowed film.
Avoid unreasonable moisture A get off mist can help, but too much irrigate may weaken attachment.
Warm environment helps Slightly warm conditions make the film more flexible and easier to use.
Practice with a save piece If your kit includes extras, try applying one to a less viewable area first.
Aftercare and Maintenance
Once installed, the protective film requires marginal sustentation. Clean your Rolex as usual with a microfiber material. Avoid harsh chemicals, as they may disgrace the adhesive material over time. Depending on wear, most protective films last anywhere from 6 months to 2 years before needing surrogate.
Final Thoughts
Installing a protective film on your Rolex is one of the smartest steps you can take to preserve its . While the work requires a steady hand and solitaire, the benefits are clear: protection against scratches, well-kept resale value, and public security of mind every time you wear your view.